
TABLE OF CONTENTS
If you’ve ever wanted to easily add a blog to your website that has a lot of SEO power, then this is for you.
You might have already researched some solutions like WordPress or Ghost, and I bet most of them would have something like
blog.yourwebsite.com as their end product. What I’m going to present you here, however, would look like yourwebsite.com/blog in the end.This structure is called a sub-folder or sub-directory, and it matters because it’s very good for your SEO. You’ll have better chances to rank on Google this way, while with the other structure, you’d basically start from scratch. If you want to blog on a sub-folder, I'll share the perfect solution with you: Bullet.so!
This solution has several benefits:
- It’s very easy to set up
- You don’t need to know how to code
- It’s a very cheap solution compared to the other options
- You will be directly adding to the established presence of your main website
- You’ll especially love this if you’re already a Notion user and like to write on there!
Here’s how you can set up your own blog on a sub-folder with Bullet.so - just follow the tutorial.
Step 1: Sign-up for Bullet.so
This is the most important step, since Bullet.so is the tool we'll be using for this. There are a few other tools out there that can achieve a similar outcome, like Feather.so, Super.so, Potion.so or Helpkit. I've compared them all and Bullet.so is definitely the best and at the same time cheapest option to blog on a sub-folder. If you're interested in a more in-depth comparison between these tools, write me a message and let me know!
Here’s what to do:
- Register: Create an account on Bullet.so to get started. You can create your account for free, but you'll need the "Personal" plan ($9/month) to create a sub-folder for blogging.
- Blog setup: Bullet.so allows you to literally set up your site in a few minutes, no joke. Select a blog template and you're good to go!
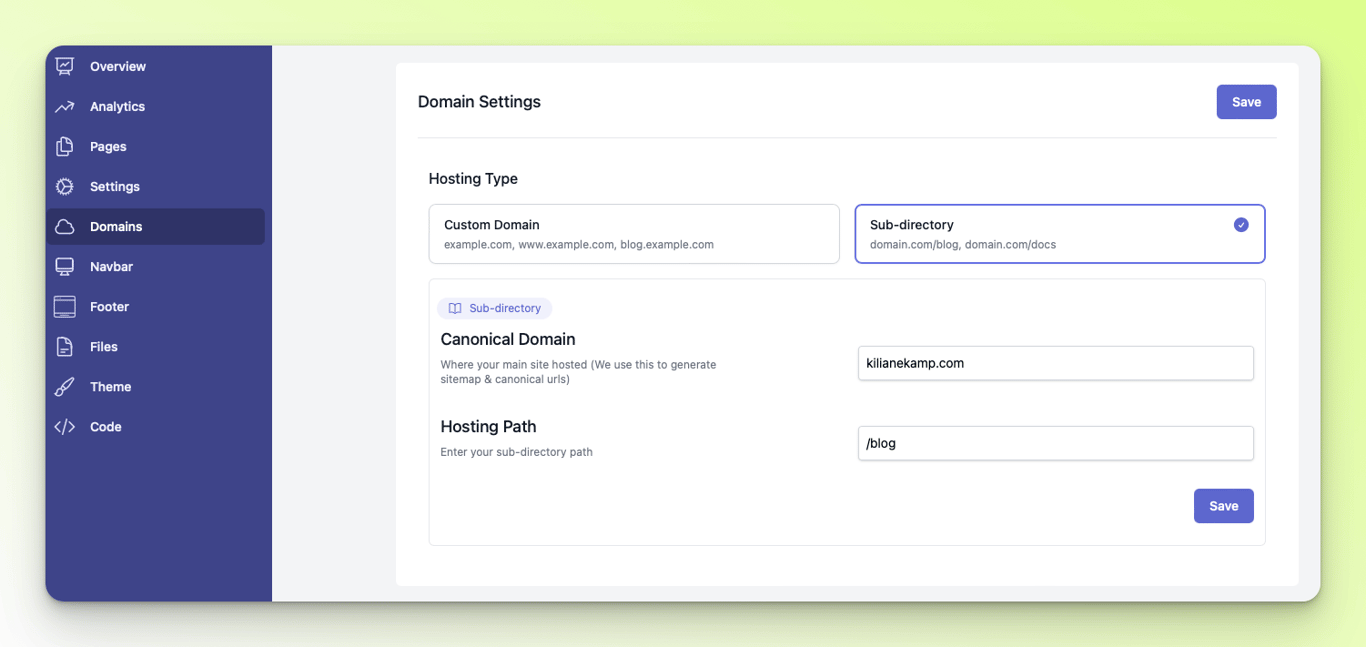
- Choose your sub-folder/sub-directory: On Bullet.so, go to Domains > Sub-directory. Enter your main domain and your sub-directory. Instead of
/blog, you can be creative and choose a different name as well. Click on Save. Later, you can verify your sub-folder once you finished Cloudflare setup in Step 2.
- Notion: Bullet.so is set up in a way that you can directly write in Notion. If you're like me and Notion is your favorite writing tool, this is absolutely fantastic. Follow the steps indicated during the site setup to connect your Notion account to your blog.
- Cloudflare: You need to set-up Cloudflare workers to enable blogging on a sub-folder. No additional costs are involved.
One thing I would like to point out: The customer support of Bullet.so has been spectacular. Their founder Aswin Kumar has been available via chat and Discord, you really feel that this startup cares about building a customer base that has success on their platform!
Step 2: Cloudflare
Now when it comes to Cloudflare, many people get caught up in the technical depth of this platform. Don't do it. I know Cloudflare can do a lot, but you don't need 99% of that to launch your site.
Launching your site is what we're focusing on. Therefore, just follow this simple steps to get your blog on a sub-folder.
Here’s exactly what I did and what 100% worked for me:
- If you haven't yet, create an account on Cloudflare, choose the free plan and add your website.
- Follow the instructions on the page to change your nameservers to Cloudflare. You’ll likely have to go to the site where you bought your domain. This should just take you a minute or so, but in case you have trouble, just google “Cloudflare nameserver setup {{site where you bought/host your domain, e.g. GoDaddy}}”
- In your Cloudflare dashboard, click on Workers Routes → Manage Workers → Create application → Create worker and give it a name. Then click Deploy.
- In the worker you just created, click on Quick edit or Edit code. A code editor will open, but don't worry!
- Copy this code:
addEventListener("fetch", (event) => {
  // Add your bullet subdomain below. Avoid trailing slash
  const bulletUrl = new URL(`https://your-url-bullet.pages.dev`); // Add sub-directory path where you want to see your bullet site in the next line. Avoid trailing slash/
  const subdirectory = "/blog";

  const requestUrl = new URL(event.request.url);
  const pathname = requestUrl.pathname;
  if (pathname.startsWith(`${subdirectory}/`) || pathname === subdirectory) {
    event.passThroughOnException();
    event.respondWith(
      fetch(
        `${bulletUrl.origin}${pathname.replace(subdirectory, "")}`,
        event.request
      ).then((response) => {
        const clonedResponse = new Response(response.body, response);
        if (clonedResponse.status === 308) {
          const redirectLocation = clonedResponse.headers.get("location");
          const destination = (subdirectory + redirectLocation + "/").replace(
            "//",
            "/"
          );
          redirectLocation &&
            clonedResponse.headers.set("location", destination);
        }
        return clonedResponse;
      })
    );
  } else {
    event.respondWith(fetch(event.request));
  }
});
- In the code editor, simply paste that code in line 11, meaning below the welcome message shown to you by Cloudflare in line 1-9 that all start with an asterisk (*). If there already is some code, simply overwrite it.
- Now in line 14 of your code, you'll have to make a simple change. The expression
https://your-url-bullet.pages.devis just a placeholder. You'll now head to your Bullet.so dashboard. Under Production Deployment, you’ll find a deployment link like the one you see in the screenshot below. Copy that URL from your dashboard.

- Paste the URL into line 14 in the code editor in Cloudflare and overwrite the placeholder. Now delete the numbers and the dot in the first part of the URL, so instead of
https://6012345.yourwebsite-bullet.pages.dev, your final URL would look likehttps://yourwebsite-bullet.pages.dev, with your Bullet.so domain name.
- If you want to have your blog on another sub-folder than yourwebsite.com/blog, then you'll also have to change line 16 accordingly.

- Click Save and deploy.
- From the code editor, go back to the previous page. Click Triggers and scroll down to Routes. Click on Add route. In the route field, add your blog URL and place an asterisks at the end. It will look something like this:
https://yourwebsite.com/blog*Of course, if you chose another name for your blog then /blog, change that accordingly. Select your website and click Add route.
Congratulations, you did it! That was all.
If you're facing any troubles or Cloudflare doesn't work for you, here's another tutorial.
Seriously, don't let this Cloudflare setup overwhelm you. Even as a non-technical person, it's totally doable by just following the steps. We want to launch your site, and for that, you don't necessarily have to understand everything that's going on under the hood.
Okay, now you've done it. You can publish new articles directly from Notion (just follow the steps in your Bullet.so dashboard) and they will be published on yourwebsite.com/blog. I could hardly think of an easier setup to blog!
TL;DR
- Blogging on yourwebsite.com/blog instead of blog.yourwebsite.com is better for your SEO
- It can be pricey (Ghost) or overwhelming and complicated (Wordpress) to set up a blog
- The easiest, cheapest, and simply best set-up I could think of is via Bullet.so
- With Bullet.so , you can publish blog posts right out of Notion
- Don't get caught up in the technical depth of this, just follow this guide and you'll be fine!
→ Bullet.so is a fantastic option if you want to blog on your website without a subdomain, by simply setting up a /blog sub-folder.
Referral link
If this article was helpful for you and you want to try Bullet out for yourself, I invite you to use my referral link: https://bullet.so/?ref=1

Related Posts


Automate Your Finances: How to Save and Invest on Autopilot
Achieve financial peace of mind.